11 March 2016

Install and Configure VMware ESXi 6.0

There are few system requirements that must be met before you can install ESXi 6.0 server:
- Make sure the server hardware that you are going to install ESXi server on is supported by VMware vSphere. You can check that using VMware Compatibility Guide.
- The physical server must have 64-bit processors with at least two CPU cores.
- The physical server must have minimum of 4GB of RAM. You need at least 8GB memory to install a virtual machine after ESXi server is installed.
- The NX/XD bit must be enabled in the BIOS. Intel-VT for Intel processors and AMD-V for AMD processors.
- The physical server must have one or more Gigabit Ethernet adapter.
- Compatible disk storage.
Install and Configure VMware ESXi 6.0
There are different ways to install ESXi server. You can use interactive installation (CD/DVD, USB drive, and PXE boot), scripts or auto deploy. Here, I will use interactive method using CD/DVD media to install ESXi server. You can download installation ISO image from VMware. Let’s begin the installation. First, make sure the server is configured to boot from CD/DVD. Insert CD/DVD in to the DVD-ROM or map ISO image to virtual CD/DVD drive and boot the server from ISO image.
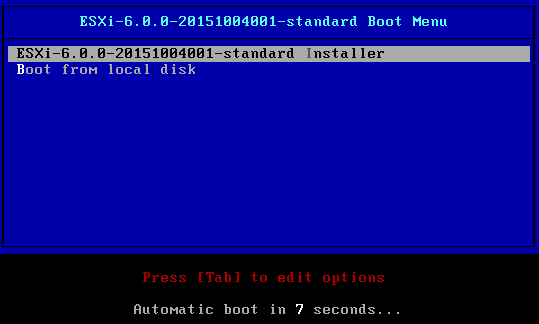
Once you start the server with ESXi installation media, you will be presented with ESXi standard boot menu as shown above. Choose ESXi standard installer to start the ESXi installer. Press [Tab] to toggle the selection and press [Enter] to choose the selection. As you can see above, you also have option to booth from local disk.
 Welcome screen appears as shown above. Press [Enter] to begin the installation of ESXi server.
 Press F11 to accept the license agreement.
Choose the storage and press [Enter] to continue. As you can see above the disk type is VMware Virtual S, this is because I am installing ESXi server on a VMware Workstation virtual machine. You can press F1 to see more details about the disk. If you are installing ESXi server on a local SAS storage, it will be listed as remote devices.
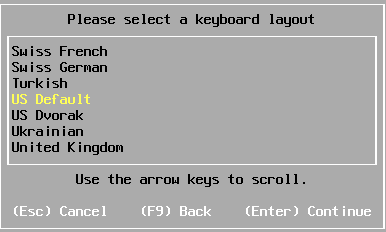
 Choose the keyboard layout. Press [Enter] to continue.
Enter the password for root user account. The password must be at least 7 characters long. Press [Enter] to continue.
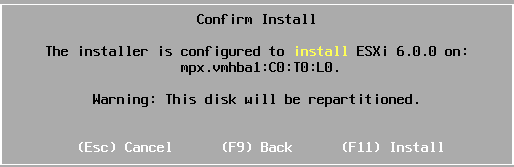
To confirm the installation press F11.
The installation now begins.
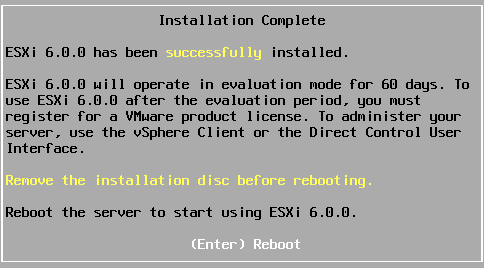
Press [Enter] to reboot and complete the installation.
After the reboot, you can see the Direct Console User Interface (DCUI) above. You can see the ESXi build number, memory and processor information and IP address. As you can see above by default, ESXi is set to receive IP from DHCP server. You can press F2 to login to DCUI to change IP address, DNS, hostname and other information.

Configure IP Address and Hostname in ESXi Server

You need to have physical access to the server to configure IP address in ESXi server. Press F2 to log in to Direct Console User Interface (DCUI) of ESXi server. You can configure DNS and hostname using vSphere client. 
 Enter the password for root user account. Press [Enter]. You will be presented with list of system customization list as shown below.
 As you can see above, the IP address 192.168.0.22 was acquired from DHCP server. Select Configure Management Network option and press [Enter].
Here, you can configure IPv4, IPv6, DNS, DNS suffixes and VLAN. To configure IPv4, select IPv4 Configuration option and press [Enter].
Choose option, set static IPv4 address and network configuration. Press [Space Bar] to make the selection. Now, type IP address, subnet mask and gateway as shown above and press [Enter]. Then press [Esc] key to go back.
You will be asked to confirm the changes and restart the network. Press [Y] to restart the management network.
Now, select DNS Configuration option and press [Enter].
Configure primary and alternate DNS server and hostname. Press [Enter]. Press [Esc] to go back, you will again be asked to confirm the changes and restart management network.
As you can see above IP address and hostname have now changed. In this way you can configure IP address and hostname in ESXi server.

10 March 2016

Configure the storage area for shadow copies to go to a different NTFS volume on a Windows 2008 and 2012 servers


Problem

Backup jobs fail due to VSS related errors indicating either a lack of disk space or IO that is too high to maintain the shadow copies.

Solution

By default, Microsoft Volume Shadow Copy Services (VSS) is configured to write the shadow copies of a volume to a storage location on the volume itself.  This can result in very high IO or low disk space problems during the backup of a volume since the drive is experiencing load from the backup reading files, load and disk space usage from VSS reading from and writing to the shadow copy, and load and disk space usage from any other applications on the system using that same volume.  The shadow copy storage location of each volume on a Windows 2008 and 2012 servers can be configured to use a different NTFS volume.  The ideal situation would be to have a separate drive dedicated to shadow copies that is not being backed up and is also not the drive containing the paging file.  If this is not possible, specifying a separate drive that contains the paging file is typically still better than storing the shadow copy on the drive being backed up.  In order to configure the shadow copy storage location for each volume, the following steps can be taken:

1.  Open a command line as Administrator by browsing to C:\Windows\System32. Right-click on cmd.exe and pick Run as administrator

2.  Run the following command:

vssadmin add shadowstorage /for=<drive being backed up> /on=<drive to store the shadow copy> /maxsize=<percentage of disk space to allow to be used>

For Example:
If the VSS shadow copies of the C: drive will be stored on the D: drive and allowed to use up to 90% of the free disk space on D: the command would look like:

vssadmin add shadowstorage /for=c: /on=d: /maxsize=90%

If the command was performed successfully, the following message will be shown:
Successfully added the shadow copy storage association

The current shadow copy storage locations for each volume may also be confirmed by running the following command:
 
vssadmin list shadowstorage

17 November 2015

Backup and Restore ESXi configuration using VMware vSphere CLI

How to backup

First of all you have to download  and install the vSphere CLI tool. You should also have access to the ESXi server using the tool. Open the CLI console as is shown on the picture and run the command below.
 
Tool located at C:\Program Files (x86)\VMware\VMware vSphere CLI>


vicfg-cfgbackup.pl --server 192.168.0.1 --username root
--password your_password --save backup.cfg

==================================
vicfg-cfgbackup.pl -server 192.168.0.1 -s host01

Possible Errors: CLI Error :  Saving firmware configuration to backup.cfg …
GET https://192.168.0.1/downloads/configBundle-servername..tgz unsuccessful : 404 Not Found
Event log : Boot partition : /usr/lib/vmware/hostd/docroot/downloads//files cannot be found
Solution:

/usr/lib/vmware/hostd/docroot/downloads is only a link to /scratch/downloads/
and /scratch is link to /tmp/scratch
Problem will be solved after create a folders under /tmp
SSH to ESXi Server


cd /tmp
mkdir scratch
cd scratch
mkdir downloads
cd downloads

How to restore

You can use same command to restore, Use –load (-l) syntax instead of –save
While restore all the guest machines should be in off state. Command will give a message to shutdown all the gust VMs. ESXi will go to maintenance mode and restore the configuration and reboot the server.


vicfg-cfgbackup.pl --server 192.168.0.1 --username root
--password your_password --load backup.cfg


04 February 2015

Removing shared mailboxes from an Outlook profile


Following a server migration, an administrator had user's mailboxes showing up in his profile. This was the result of giving himself Full Access permission to the mailboxes during the migration.
When a user has Full Access permission to another user's mailbox, Outlook 2007 and above automatically opens the mailbox in the profile. (The mailboxes were not listed as secondary mailboxes in Account Settings.) The administrator removed Full Access permission for the mailboxes but this didn't remove the accounts from his profile.

You need to edit the user accounts in the Active Directory and remove your name from the MsExchDelegateListLink attribute.

01. Open Active Directory Users and Computers
02. Go to View menu and select Advanced Features
03. Open the user account that is showing in your mailbox
04. Open the Properties dialog
05. Click Attribute Editor tab
06. Locate MsExchDelegateListLink
07. Click Edit
08. Remove your name from the attribute
09. Close the dialogs


04 September 2013

Windows Server 2008 Activation error: Code 0x8007232b

When you trying to activate Windows Server 2008 and got this error:
“Activation Error: Code 0x8007232b. DNS Name does not exist”

Actually Windows was looking for KMS server for the activation and when it did not find that, it threw error 0x8007232b.

I used following method to resolve the issue:

1. Right-click Command Prompt.
2. Click Run as administrator.
3. Type the following command, and then press ENTER:


      slmgr -ipk xxxxx-xxxxx-xxxxx-xxxxx-xxxxx

Note: In this command, the xxxxx-xxxxx-xxxxx-xxxxx-xxxxx placeholder represents your MAK product key.
4. Now try to activate the Windows online, you will succeed.

Microsoft has a KB article for resolving the issue: http://support.microsoft.com/kb/929826

14 October 2012

An error caused a change in the current set of domain controllers - Exchange 2010

After demoting some domain controllers, Exchange was functional and healthy, but we were seeing the occasional error when loading recipient lists, or drilling into a specific mailbox's settings such as below:

This error is caused by GUI caching, more specifically MMC caching. This occurs when a DC (domain controller) that is either unreachable or has changed in some way is still cached by the MMC applet.

To fix this issue remove or delete the Exchange Management Console cache file during it is closed:
Delete this file: "c:\users\<specific user>\appdata\roaming\microsoft\mmc\Exchange Management Console"

This completely worked and we no longer receive the above errors.

18 November 2011

How to increase the Exchange Server 2003 SP2 18GB database size limit

The release of SP2 for MS Exchange 2003 has changed the default database limit from 16GB to 18GB. In addition, SP2 allows you to further increase the size a MS Exchange 2003 Standard Edition database to a maximum size of 75GB.

Exchange Server 2003 version
Licensed limit
Default configuration limit
Standard Edition before SP2
16 GB
Not applicable
Standard Edition with SP2
75 GB
18 GB
Enterprise Edition before SP2
8,000 GB (unlimited)
Not applicable
Enterprise Edition with SP2
8,000 GB (unlimited)
8,000 GB

To extend the Exchange database limit, follow these steps:
  1. On the computer that is running Exchange 2003 SP2, click Start, click Run, type regedit, and then click OK.
  2. Click one of the following registry subkeys, as appropriate for the store that you want to increase:
    • For a mailbox store, click the following registry subkey: HKEY_LOCAL_MACHINE\System\CurrentControlSet\Services\MSExchangeIS\Server name\Private-Mailbox Store
    • For a public folder store, click the following registry subkey: HKEY_LOCAL_MACHINE\System\CurrentControlSet\Services\MSExchangeIS\Server name\Public-Public Store GUID
  3. On the Edit menu, point to New, and then click DWORD Value.
  4. In the New Value #1 box, type Database Size Limit in Gb, and then press ENTER.
  5. Right-click Database Size Limit in Gb, and then click Modify.
  6. Click Decimal, and then type an integer from 1 to 75 in the Value data box.
  7. Click OK, and then exit Registry Editor.
  8. Restart the Microsoft Exchange Information Store service. To do this, follow these steps:
o    Click Start, click Run, type cmd, and then click OK.
o    At the command prompt, type the following command, and then press ENTER:
net stop msexchangeis
o    After the Microsoft Exchange Information Store service has stopped successfully, type the following command, and then press ENTER:
net start msexchangeis
  1. Examine the Application log to verify that the database size has been set successfully. To do this, follow these steps:
o    Click Start, click Run, type eventvwr, and then click OK.
o    In the Event Viewer tool, click Application
o    Double-click event ID 1216 to verify that the database size has been set successfully. Event 1216 is generated every time the Microsoft Exchange Information Store service is started.

17 November 2011

Error message when you try to perform a system state backup in Windows 2008 and 2012 Servers

Symptoms: When you try to perform a system state backup to a volume on which the system state file resides, you receive an error, as mentioned below:

In Windows Server 2008, you receive the following error:

ERROR - The location for backup is a critical volume.

In Windows Server 2008 R2, you receive the following error:
ERROR - The backup storage location is invalid. You cannot use a volume that is included in the backup as a storage location.

Cause: This behavior occurs because system state backups to critical volumes are blocked in Windows Server 2008 and Windows Server 2008 R2.

Resolution: You can change the default behavior of Windows Server 2008 and Windows Server 2008 R2 by adding a registry entry. You must also verify that the following prerequisites are met before you perform a system state backup to a critical volume.

  • Make sure that the target volume has no shadow copy before the backup starts.
  • If a system state backup is stored on a source volume, backup settings should be configured for full backups. By default, settings are configured for full backups.
  • Periodically check that no other user or program maintains a shadow copy on the target volume.
  • Do not keep volume level backups and system state backups in the same location. The volume used to store the system state backup needs twice the amount of free space as the size of the system state backup until the backup completes.

Notes:
  • Any writes on target volume with shadow copies will increase the diff area size. If the diff area is bounded, it may cause deletion of shadow copies.
  • Incremental backups leaves shadow copies behind, it will cause side effect as point 1.
  • Backup stores different versions as shadow copies, it will cause side effect as point 1.
  • Registry entry to enable system state backups to critical volumes
To enable the system state backup files to be targeted to critical volumes, you must set the value of the AllowSSBToAnyVolume registry entry under the following registry subkey:

HKEY_LOCAL_MACHINE\SYSTEM\CurrentControlSet\Services\wbengine\SystemStateBackup\

If the key called "SystemStateBackup" not exist you should to create it and set the value of this entry as follows:

Name: AllowSSBToAnyVolume
Data type: DWORD
Value data: 1

Note: When this value is set to 1, system state backups to any volume are enabled. To revert to the default behavior, set the value to 0

Related Articles:

14 November 2011

System writer is not found in the backup

Symptoms: When you perform a system state backup using Windows Server Backup on Windows Server 2008, the backup fails with the following error:

System writer is not found in the backup.

Cause: The system writer fails because permissions to files in the %windir%\winsxs\filemaps\ or %windir%\winsxs\temp\PendingRenames directories are incorrect.

Resolution: To resolve this issue, type the following commands from an elevated command prompt:

Takeown /f %windir%\winsxs\temp\PendingRenames /a
icacls %windir%\winsxs\temp\PendingRenames /grant "NT AUTHORITY\SYSTEM:(RX)"
icacls %windir%\winsxs\temp\PendingRenames /grant "NT Service\trustedinstaller:(F)"
icacls %windir%\winsxs\temp\PendingRenames /grant BUILTIN\Users:(RX)
Takeown /f %windir%\winsxs\filemaps\* /a
icacls %windir%\winsxs\filemaps\*.* /grant "NT AUTHORITY\SYSTEM:(RX)"
icacls %windir%\winsxs\filemaps\*.* /grant "NT Service\trustedinstaller:(F)"
icacls %windir%\winsxs\filemaps\*.* /grant BUILTIN\Users:(RX)
net stop cryptsvc
net start cryptsvc

At the end type the following command to verify that the system writer is now listed:

vssadmin list writers

If the system writer is still missing, then open the Regedit and navigate to the following key:
HKEY_LOCAL_MACHINE\SYSTEM\CurrentControlSet\Services\VSS\VssAccessControl.
Change the value of NT AUTHORITY\NETWORK SERVICE (REG_DWORD) to 1.
You may also want to check and change the entry for other services (LOCAL SERVICE, NetworkService) those services will be indicated by event 8213 in your Application Event Log.
Related Articles:

21 September 2011

Server: Memory\Pool Non-Paged and Pool Paged Bytes

Memory\Pool Non-Paged Bytes
This measures the size, in bytes, of the non-paged pool. This is an area of system memory for objects that cannot be written to disk but instead must remain in physical memory as long as they are allocated. A typical Event ID 2019 is recorded in the system event log.

Memory\Pool Paged Bytes
This measures the size, in bytes, of the paged pool. This is an area of system memory used for objects that can be written to disk when they are not being used. A typical Event ID 2020 is recorded in the system event log.


Memory
Default(/PAE for 6-16GB )
/3GB Switch
1GB
Free System PTE: 51k
Paged Pool: 282MB
Non Paged Pool: 212MB 
Free System PTE: 32k
Paged Pool: 163MB
Non Paged Pool: 131MB 
2GB
Free System PTE: 196k
Paged Pool: 360MB
Non Paged Pool: 262MB 
Free System PTE: 16k
Paged Pool: 262MB
Non Paged Pool: 131MB 
3GB
Free System PTE: 195k
Paged Pool: 360MB
Non Paged Pool: 262MB 
Free System PTE: 14k
Paged Pool: 262MB
Non Paged Pool: 131MB 
4GB
Free System PTE: 106k
Paged Pool: 336MB
Non Paged Pool: 285MB 
Free System PTE: 15k
Paged Pool: 258MB
Non Paged Pool: 154MB 
6GB
Free System PTE: 186k
Paged Pool: 366MB
Non Paged Pool: 262MB 
Free System PTE: 12k
Paged Pool: 239MB
Non Paged Pool: 131MB 
8GB
Free System PTE: 182k
Paged Pool: 366MB
Non Paged Pool: 262MB 
Free System PTE: 12k
Paged Pool: 225MB
Non Paged Pool: 131MB 
12GB
Free System PTE: 175k
Paged Pool: 366MB
Non Paged Pool: 262MB 
Free System PTE: 12k
Paged Pool: 196MB
Non Paged Pool: 131MB 
16GB
Free System PTE: 167k
Paged Pool: 366MB
Non Paged Pool: 262MB 
Free System PTE: 12k
Paged Pool: 169MB
Non Paged Pool: 131MB

Categories

Popular Posts

My Blog Visitors Counter

Flag Counter

Contact Me

Name

Email *

Message *

Dejan Zdraveski. Powered by Blogger.